If you’re a podcaster, you have enough on your plate…
- Scheduling guests
- Getting that sweet sponsorship income
- PORING through way-too-expensive microphones on Amazon.
So little time.
Oh wait, but we have to edit our podcasts too?? Get them sounding good? Leveled? Loudness normalized??
Ain’t nobody got time for that!
These expensive mics aren’t going to buy themselves.
Enter the Auphonic Leveler.
It’s a post-production tool that’s going to save you MASSIVE time and energy producing a podcast that sounds great.
It’s magic, actually. (oh, and it’s free to use for 2 hours a month!)
Here’s my short-n-sweet Auphonic tutorial.
What is Auphonic?
Auphonic is a free tool for audio post-production.
It’s mostly used by podcasters 😉
Basically, you’ll upload some of your raw audio–fill in some details (optional), choose the different processing effects you want Auphonic to perform on your show–and click “process.”
Auphonic does magic wizarding stuff–and spits back your file sounding better and ready for publishing
!!!!
(most people usually “cut” their episodes, I.e. chop the segments, remove big pauses and “ums” and “ughs,” etc–and THEN upload to Auphonic.)
What does Auphonic do to my audio?
Auphonic does lots of cool stuff–mostly geared around taking your raw, mostly un-processed audio, and cleaning it up, polishing, and making it sound way better and ready to publish ????
- Adaptive Leveler = Corrects level differences between different tracks of your podcast. In other words, makes the softer parts LOUDER, and makes the LOUD parts softer. It balances out the loudness!
- Limiter = Puts a ceiling on your overall loudness, so it doesn’t accidentally blow people’s ears off or crush your car speakers if you start yelling on your podcast 🙂 (It can limit the peaks of your audio to a decibel level, like -1db)
- Loudness Normalization (my fave feature) = This basically brings up your entire podcast episode to be ROUGHLY the same volume as all the other podcasts in internet land 🙂 (I.e. one shouldn’t have to touch their volume knob in between your podcast and other people’s podcasts). The loudness standard is expressed in “LUFs,” and specifically, a podcast usually targets -16 LUFs.
- Noise and Hum Reduction – Can reduce the, well, noise? and hum? of your audio tracks? Just cleaning them up a bit.
Is Auphonic Free?
Auphonic gives you TWO free hours of audio processing every single month.
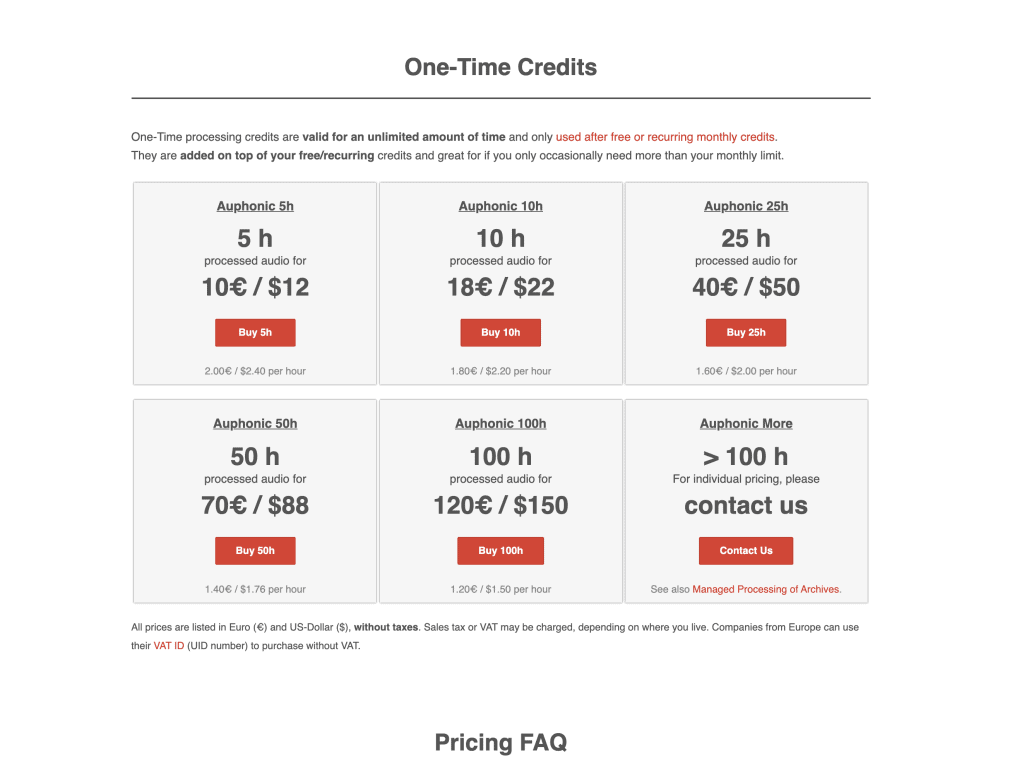
Outside of the two hours, you can pay for additional hours in 2 different ways:
- You can pay for a recurring monthly amount
- You can pay for some hours in bulk that never expire
- (Oh, and you can also pay a one-time fee to access a DESKTOP version of Auphonic)
Auphonic VS Levelator VS FixMyLevels
Levelator is an old (very old) free program that automatically levels your audio–similar to Auphonic.
However, it has some huge downsides:
- It isn’t supported anymore! (It doesn’t work at ALL on MacOS Catalina, and even on Windows–it hasn’t been updated in forever).
- Zero control over anything.
You drag audio into the Levelator app, and it spits it back at you. There are no controls, there are no options, nothing.
How do you use Auphonic? My complete Tutorial
Let’s get our hands dirty.
1 – Prepare your audio for upload
First, I recommend cutting your episodes, i.e. remove unwanted audio snippets, filler words, and moving around intro music, sound effects, etc.
I do all this in my DAW (Logic Pro).
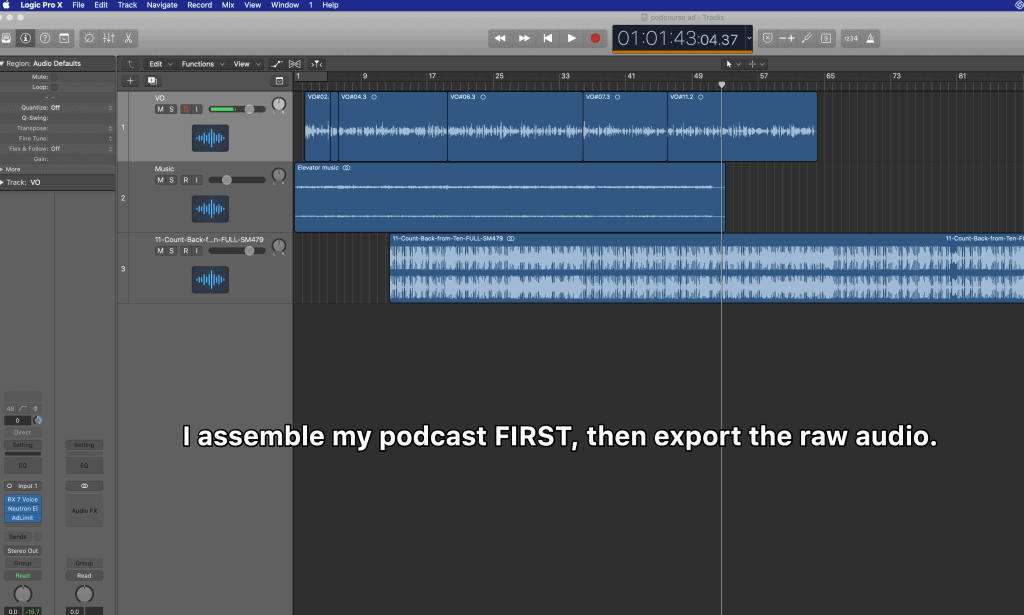
Now is also a good time to EQ your tracks if you’d like–it’s one of the few post-processing things that Auphonic DOESN’T do (though it only makes a small difference for more podcasters).
2 – Sign up for an Auphonic account.
Again, it’s totes free for 2 hours a month, but you’ll need to grab an account.
Done and done, mah friends.
3 – Choose between “multitrack” and “single track” production.

Let’s break these down:
Singletrack production:
You upload 1 audio file to Auphonic.
Basically, you’ll “mix down” all of your tracks into a final .mp3 (or .wav), and Auphonic is going to process the entire file at once).
Multitrack production:
You export multiple audio files to Auphonic
You’ll export ALL YOUR TRACKS SEPARATELY from your editing software (DAW), and upload each one to Auphonic.
It will actually process each file separately, AND then again together. (This also allows you to specify some tracks as foreground tracks, and some tracks as background tracks, and Auphonic can actually lower background audio levels on autopilot).
(Watch my YouTube video above for an example)
I personally like to use the multitrack production option 🙂
4 – Configure your episode details & upload audio!
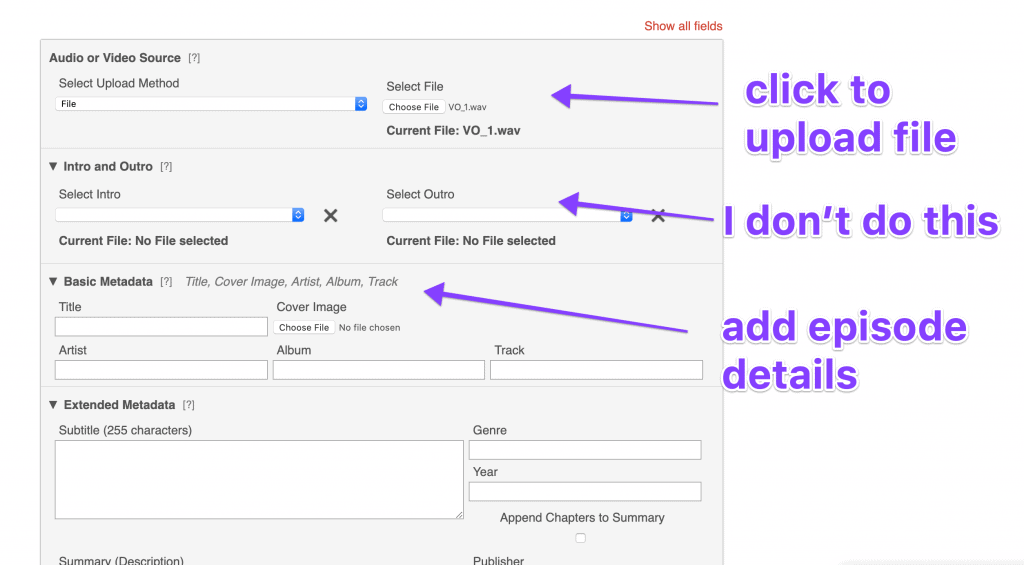
First up, you’ll upload your audio (derp).
Second, Auphonic actually gives you the option to tack on an episode intro and outro
Basically–if yo have a separate audio file for intros and outros, you can upload those here–and even set an “overlap,” so your intro music, etc, can overlap with your main podcast recording.
Learn more about the Auphonic intro/outro process here.
Next up, you can type in your episode details if you’d like (I never do this, as I just fill out my episode metadata in my podcast host, Redcircle)
Next, add chapter marks (I never do this either, but some podcasters swear by it).
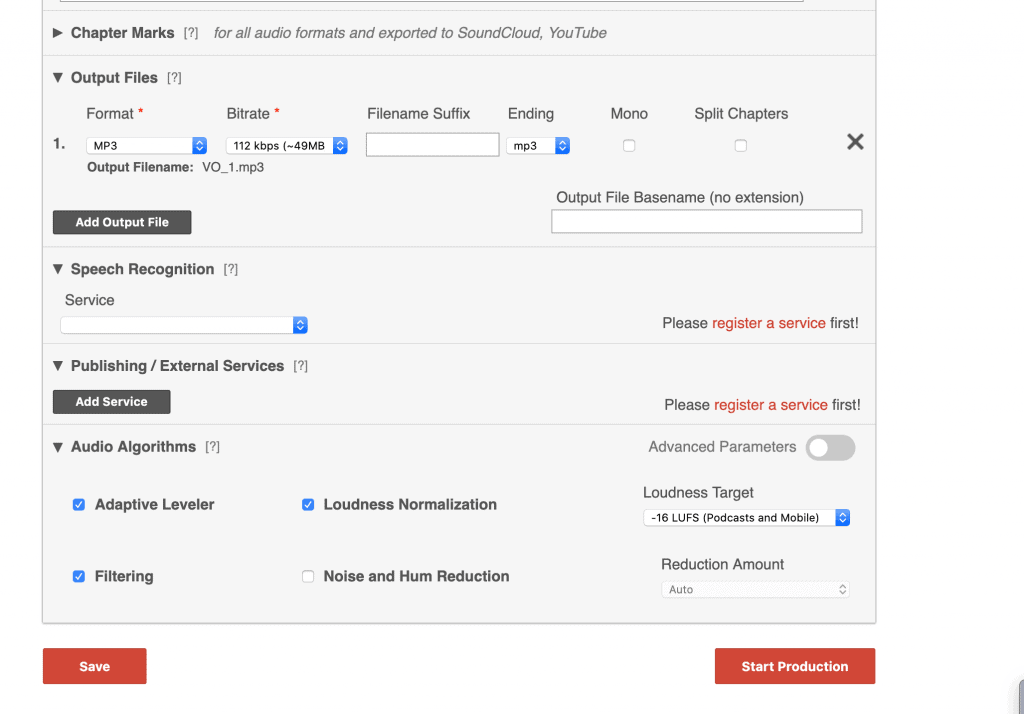
Then set up your output files (pro tip: You can actually export MULTIPLE output files at the same time).
I generally choose:
- .mp3 format
- 112 bitrate
- mono
Also, you can set a filename suffix, i.e. “final” or “auphonic export” this will tack on that word to your exported file.
Next, you can hook up an external transcription services to Auphonic.
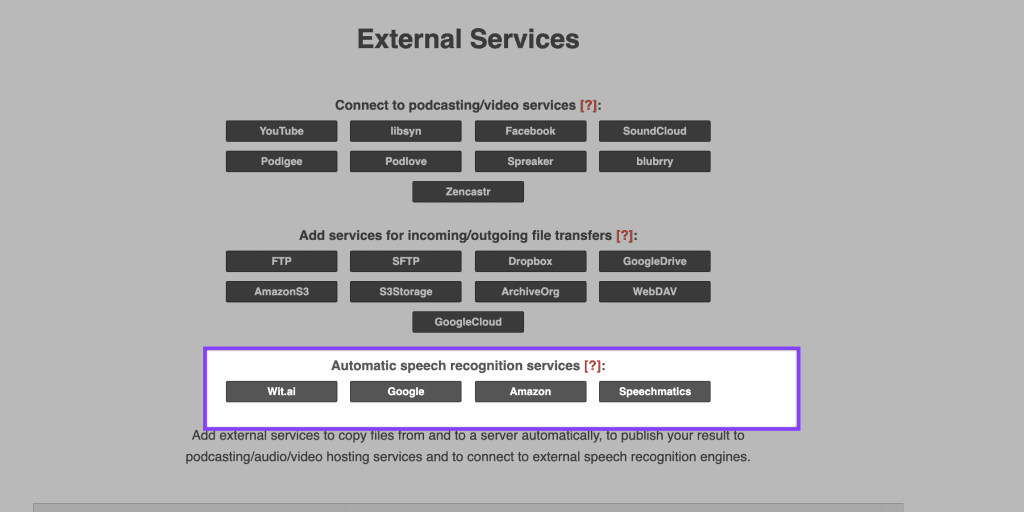
And what does this do?
When Auphonic processes your audio, it can automatically send the exported file through your transcription service!
Oh oh oh, and Auphonic can automatically UPLOAD TO YOUR PODCAST HOST!
I.e. no downloading to your computer and then uploading again to your host!
(Pro Tip: Even if you don’t see your podcast host listed, you can generally create an FTP account with you host, and then add the FTP integration in Auphonic).
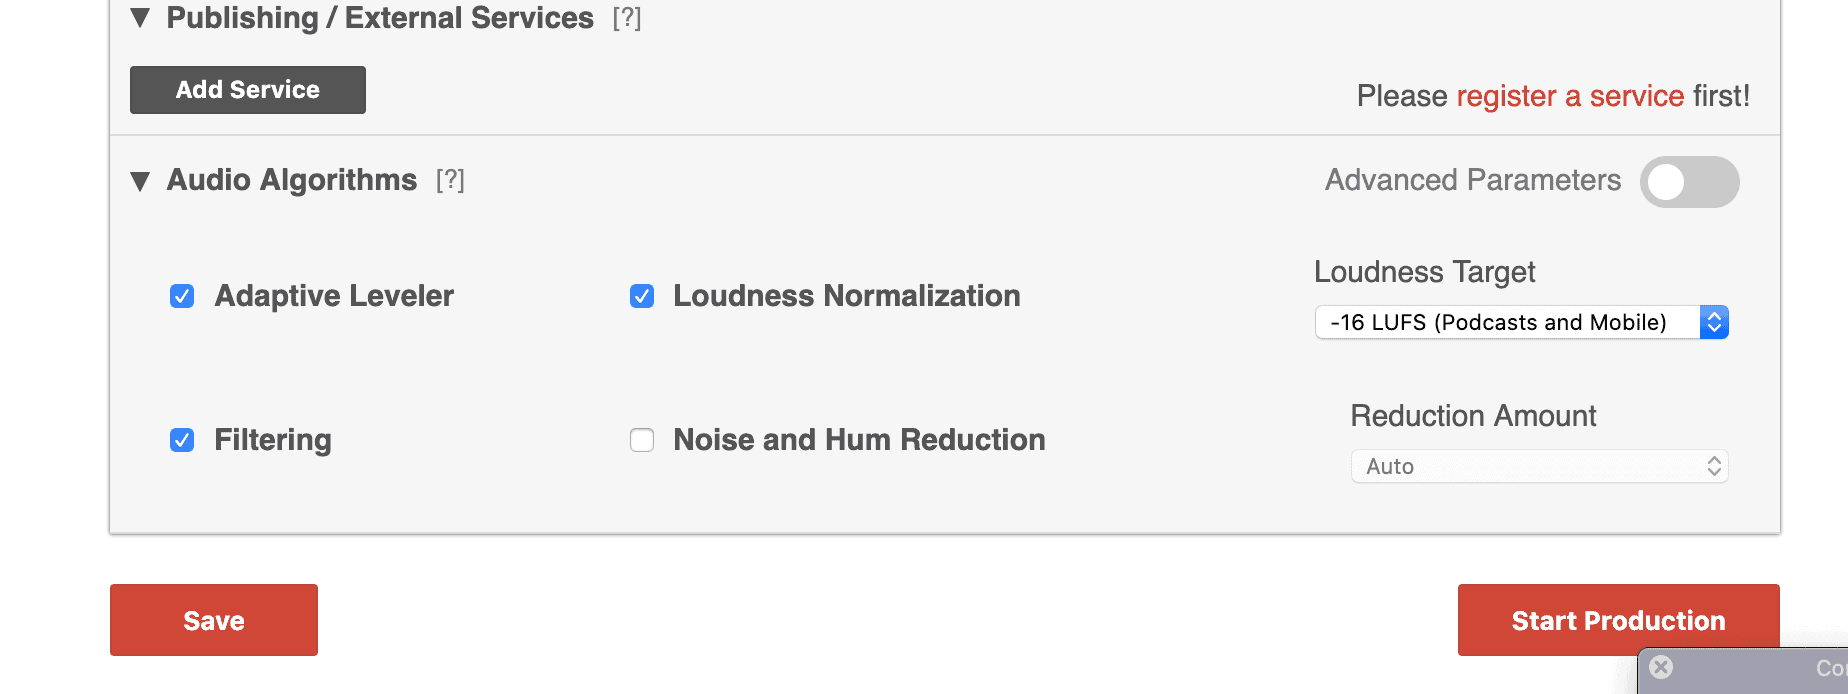
5 – Set Auphonic Audio Algorithms
This section is what makes Auphonic super awesome. You can choose to add…
- Adaptive leveler
- Loudness normalization (I recommend -16 LUFs for stereo podcasts, and -19 LUFs for mono)
- Filtering
- Noise and hum reduction
You can also specify the noise reduction amount (i.e. just a little of noise reduction, or a ton. I generally leave it on “auto.”)
After that, just hit “start production!”
6 – Check (listen) the output file to make sure you’re happy with it.
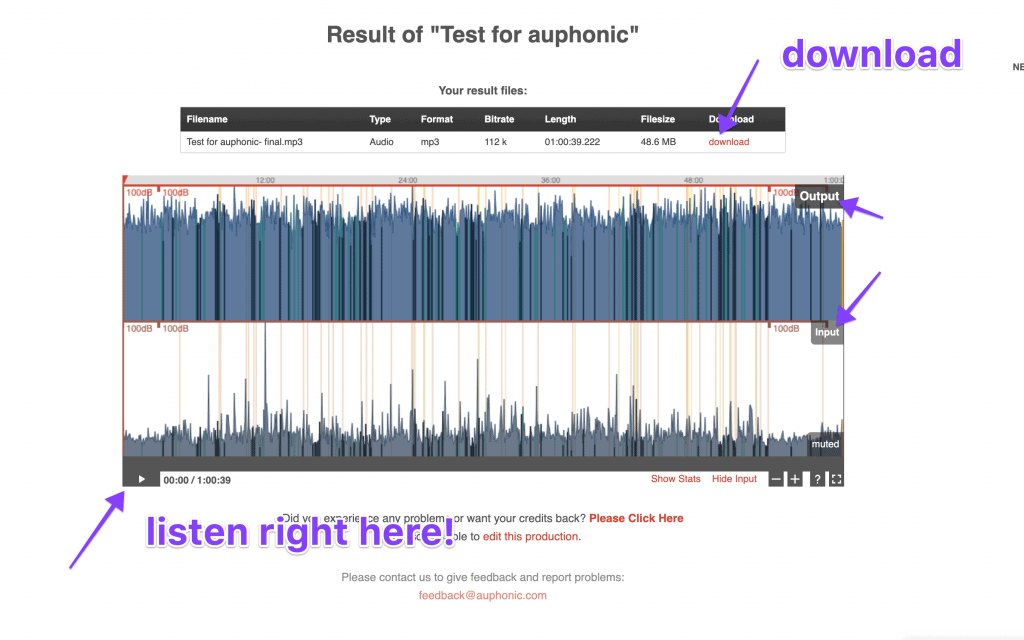
You can actually listen to the exported track right in Auphonic before you download–and even request a change before you’re charged for the processed audio.
How nice of them!
If you’re happy, then just smash the “download” button, and you’re good to go my friend ????
Related podcasting content:
Hope you enjoyed this little tutorial!
Got questions on Auphonic? Or any other podcasting Q?
Hit me up in the comments!