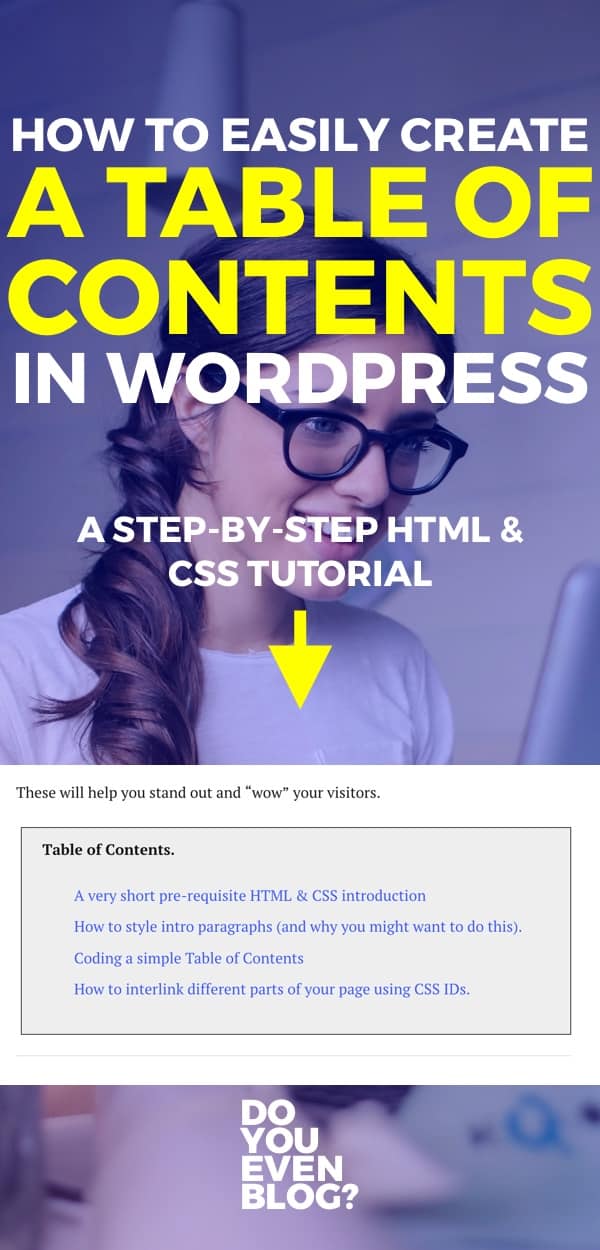
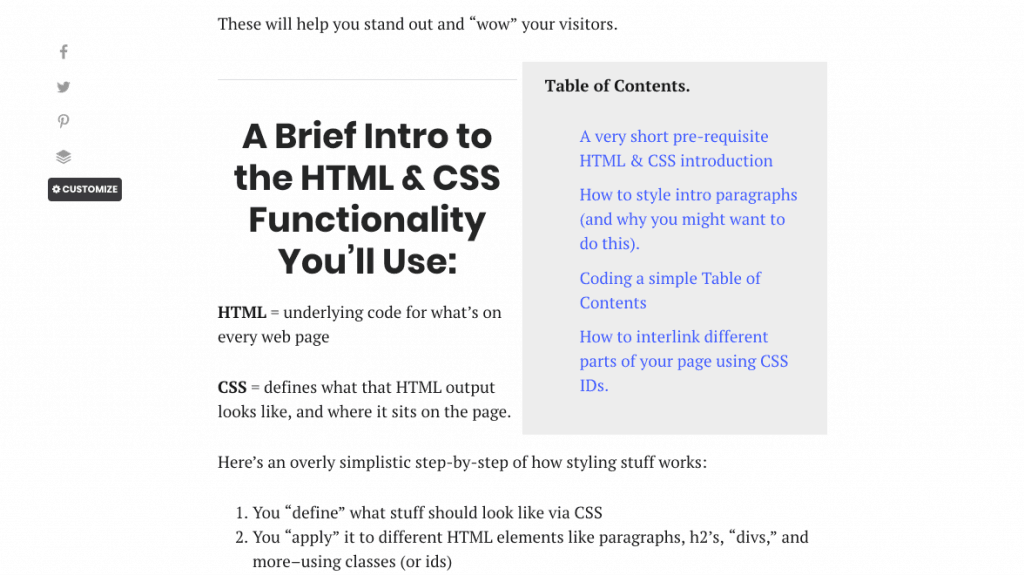
See that fancy table of contents a few sentences down?
In this post, I’m going to show you how to create something like this for YOUR blog, as well as a custom “intro paragraph” style, and more!
The internet is FULL of blog posts, with more and more coming every day.
The most important question to ask yourself?
How I can set my blog apart? How can I get noticed? How can I keep readers engaged to convert them into super fans?
Ok, so that was like, 3 questions. But still.
Today I’m going to walk you through two easy HTML/CSS design hacks that can help make your content hold reader’s attention longer (making it more likely to convert them!!!), and provide a better user-experience (which FAR too few bloggers are trying to do!)
These will help you stand out and “wow” your visitors.
Table of Contents.
A Brief Intro to the HTML & CSS Functionality You’ll Use:
HTML = underlying code for what’s on every web page
CSS = defines what that HTML output looks like, and where it sits on the page.
Here’s an overly simplistic step-by-step of how styling stuff works:
- You “define” what stuff should look like via CSS
- You “apply” it to different HTML elements like paragraphs, h2’s, “divs,” and more–using classes (or ids)
CSS Class = for our purposes, let’s just say it’s a user-defined way to “link” HTML and your custom CSS.
You can name your CSS classes whatever you like, and when defining them in your CSS customizer, the syntax looks like this: .class-name { attribute-were-changing: definition; }
Note the period before the class name.
And applying that class looks something like this in our HTML: <div class="class-name">your blog content in here</div>
Note NO PERIOD when targeting the class in your HTML.
This will all make more sense as we go along.
How to Add Fancy Styles to Your Intros.
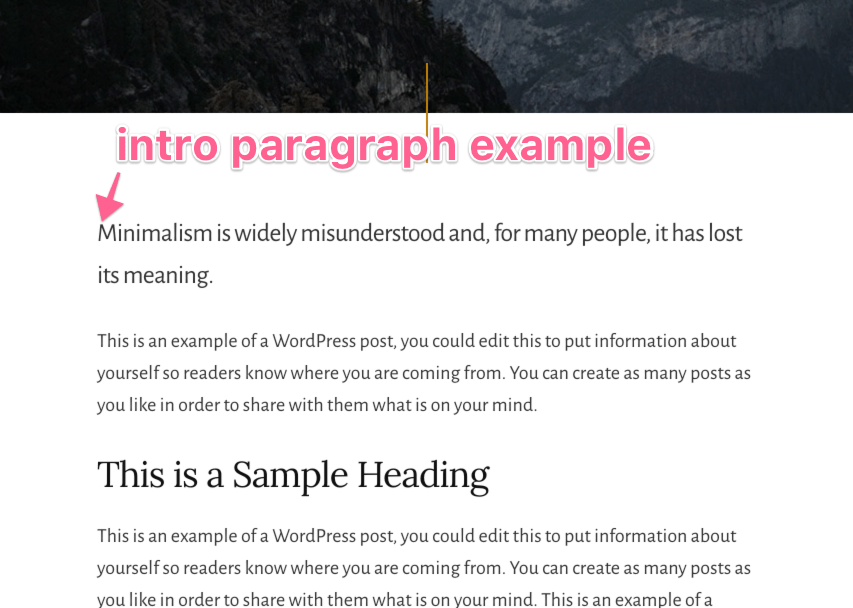
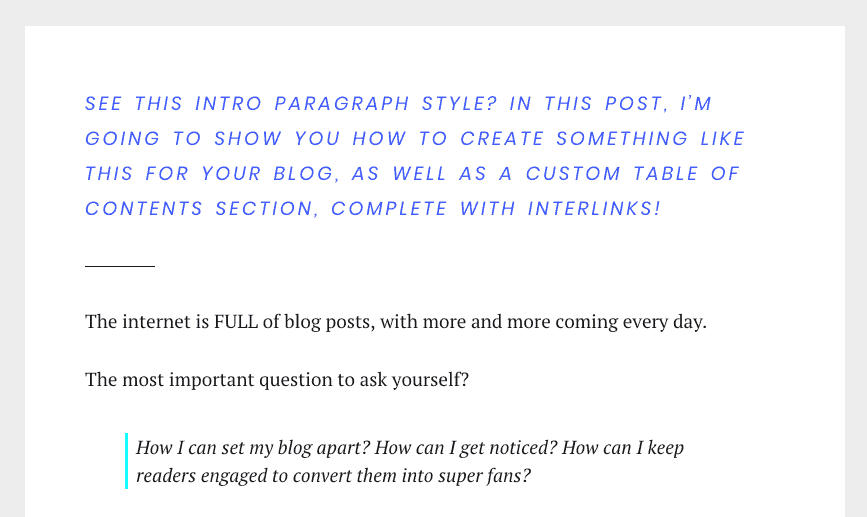
Some WordPress themes have this feature built-in, like so:
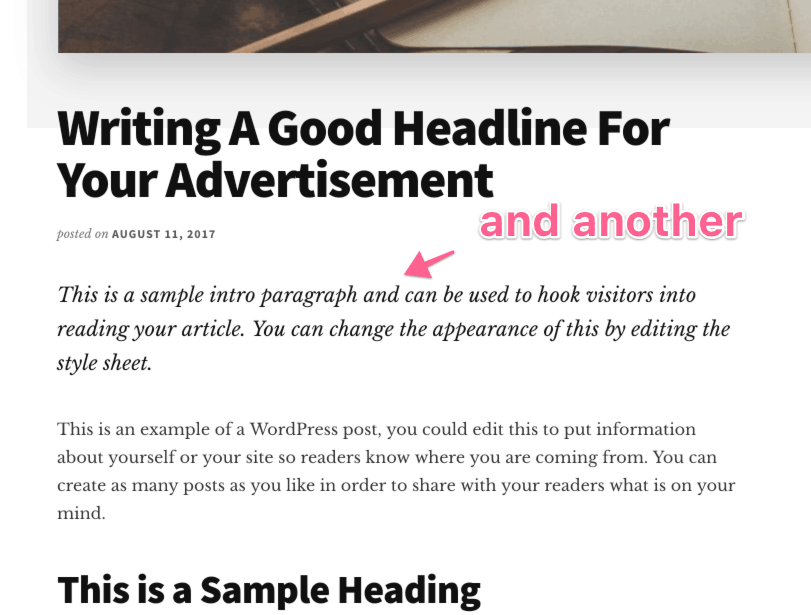
and here’s another:
Why would a blogger want to do this?
A few reasons:
- It looks fancy and is fun.
- It’s a nice way to signify “HEY READ THIS FIRST” if you have something important to say or introduce.
- You can also “hide” SEO keywords up here 🙂
Check out what I did for my post on crafting awesome headlines:
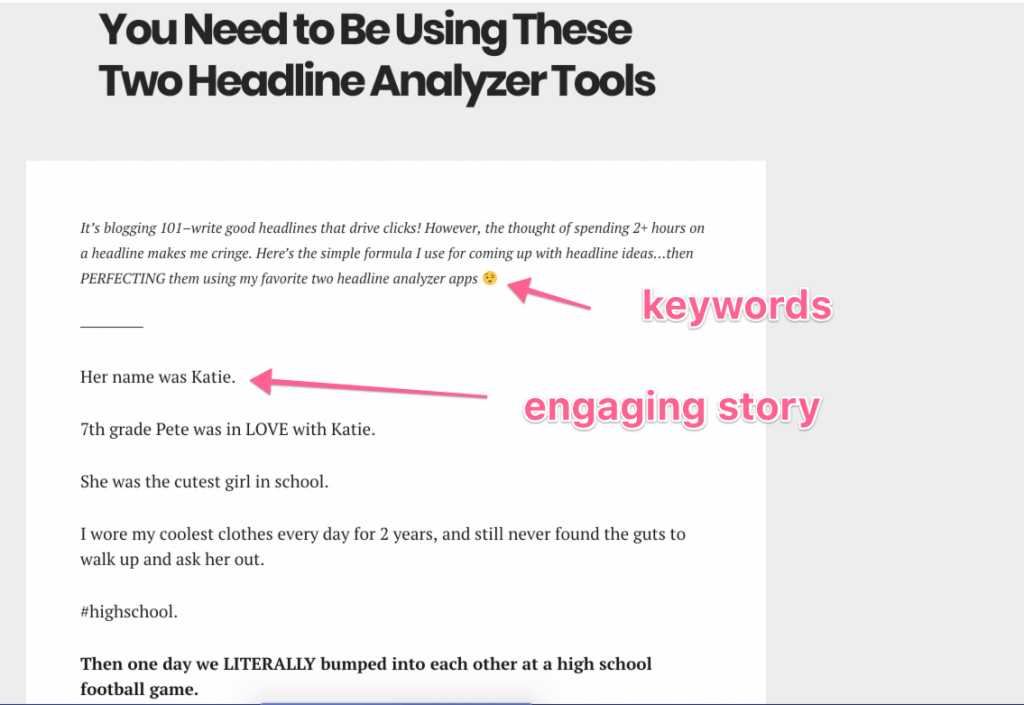
I didn’t really WANT to start a blog post trying to keyword stuff–I wanted people to get sucked into the engaging story.
So I opted to make a little intro paragraph to include a brief summary of the post (including some keywords), and have it set apart as to NOT draw the attention.
I wanted attention drawn on the story, not the keyword-stuffed intro paragraph.
So here’s our two-step process for creating these:
- Create the custom CSS FIRST and name it
- Manually tag any intros you want with the class HTML.
First, choose a name for the CSS class and define the styles:
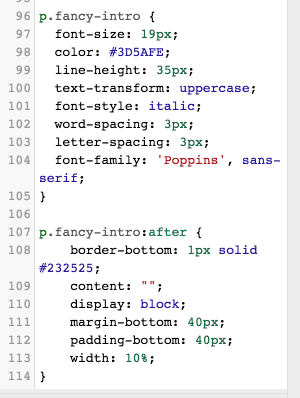
In this example, I’ve named mine “fancy-intro,” and defined it as such with a period in front of it in my CSS.
Important note: What is that “p” doing before “.fancy-intro?”
Sadly, just copying and pasting what I have might not work for you–because every WordPress theme can act a bit differently!
You may have overriding CSS elsewhere in your theme, and will, therefore, have to “target” the intro paragraph a bit differently.
This could take a bit of trial and error, but try targeting with some of these first (where “name” is the name of your CSS class):
- .name
- p.name
- .entry-content p.name
- .single .entry-content p.name
So what all can you customize? Pretty much anything you can think of.
Font size, underlines, italics, colors, letter-spacing, etc.
Sadly, we don’t have time to fully explore every single CSS option here.
My advice is to copy and paste the CSS I have below, and keep your changes simple! There’s no need to go really fancy.
Here’s a great style to start:
p.intro {

font-size: 1em;

font-style: italic;

letter-spacing: 2px;

}
p.name:after {

border-bottom: 1px solid #232525;

content: "";

display: block;

margin-bottom: 40px;

padding-bottom: 40px;

width: 10%;

}
FYI – that 2nd part of code adds a small little line beneath your intro paragraph. If you don’t want the line, just remove it!
Here is a HUGE resource for styling text via CSS. Highly recommended if you want to get fancier.
Second, here’s how you APPLY that CSS to intros (or any paragraphs, actually):
For any paragraph you want to apply your style to, simply head into your HTML editor and “wrap” your text with the appropriate HTML:
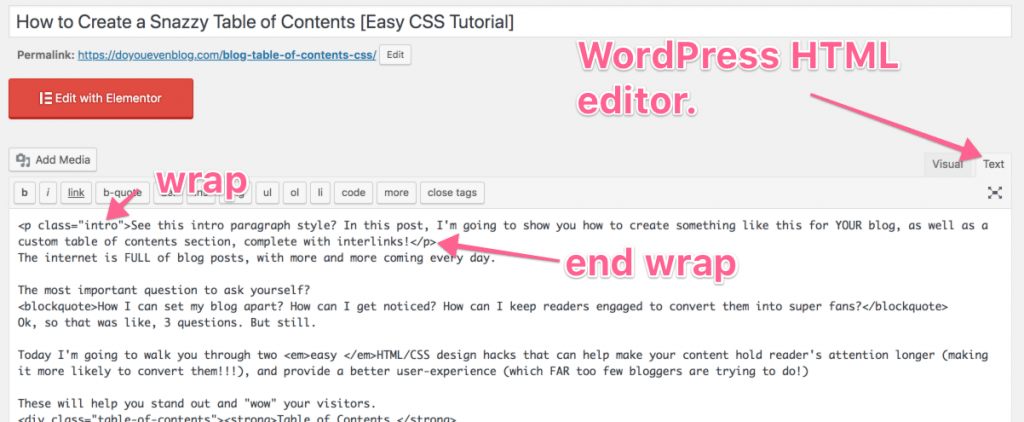
Wrap the text with brackets, “p”, and class=”name”…
Example:
<p class="intro">Welcome to this kick-butt blog post keyword keyword keyword</p>
That’s it!
How to Set-up a Handy Table of Contents
First, we’ll style it in our CSS and apply it to our HTML using a div.
Then, we’ll learn how to link to different parts of our blog post.
First, watch this video on how to create CSS boxes:
These “call-out” boxes are INSANELY effective at breaking up huge mega-posts (like my massive guide to starting an impactful blog) and keeping readers highly engaged in your content.
Actually, that simple call-out box could just be your table of contents!
Here are few CSS boxes you can steal, to begin with:
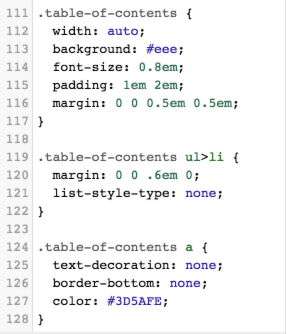
Here’s the custom CSS I’m using for mine:
Here’s a code for one like this to start with:
.table-of-contents {

width: auto;

background: #eee;

font-size: 0.8em;

padding: 1em 2em;

margin: 0 0 0.5em 0.5em;

}
.table-of-contents ul>li {

margin: 0 0 .6em 0;

list-style-type: none;

}
.table-of-contents a {

text-decoration: none;

color: #3D5AFE;

}
Do you have a pretty wide content area? (mine is fairly narrow), you might try aligning it to the left or right.
Note: This doesn’t look great on my site, as my content width is around 700px. Try this on wider content areas and it could look cool.
Change your class CSS to this:
.table-of-contents {

float: right;

width: 50%;

background: #eee;

font-size: 0.8em;

padding: 1em 2em;

margin: 0 0 0.5em 0.5em;

}
Of course, you can obviously customize things like link colors, background colors, space between bullet points, whether or not to show bullet points, etc.
Here’s another I’m trying:
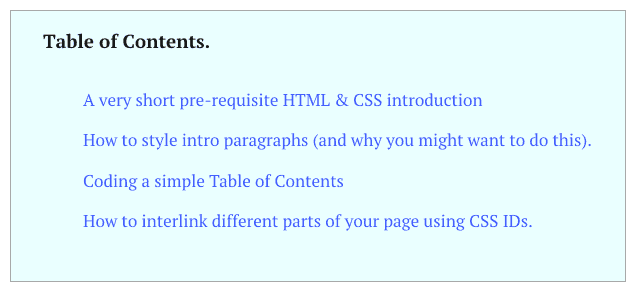
Here’s the code for that:
.table-of-contents {

width: 80%;

background: #EAFFFF;

border: 1px solid #aaa;

display: table;

padding: 1em 2em;

margin: 0 0 0.5em 0.5em;

}
A huge word of warning:
If you’re not familiar with mobile-first CSS, I would NOT recommend setting a specific width and float value.
If you’re not careful, you could end up with this for your mobile readers:

If you’re a pro, you can use @media queries to specify breakpoints at which you’d like to set your floats and widths–but if you have no idea what I’m talking about, just set your width to auto 🙂
In general, I’d recommend keeping things extremely simple if you’re not comfy in HTML & CSS.
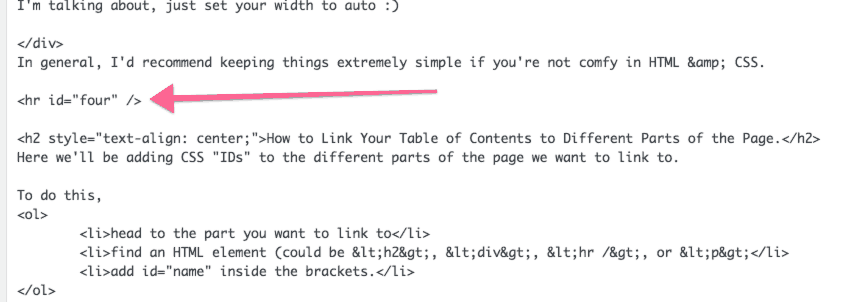
How to Link Your Table of Contents to Different Parts of the Page.
Here we’ll be adding CSS “IDs” to the different parts of the page we want to link to.
To do this,
- head to the part you want to link to
- find an HTML element (could be <h2>, <div>, <hr />, or <p>
- add id=”name” inside the brackets.
Obviously, “name” will be replaced by whatever you choose to name the section of your blog post. I usually number my sections “one” or “chapter-one” or “ch1”.
For example, see that little line before the header just above? It’s linked to.
If you’re linking to different subheaders in your post, you can also add it with the <h2> or <h3> elements.
<h2 id="name">This is a head I'm linking to</h2>
or
<h3 id="chapter7">This is chapter seven</h3>
Sweet!
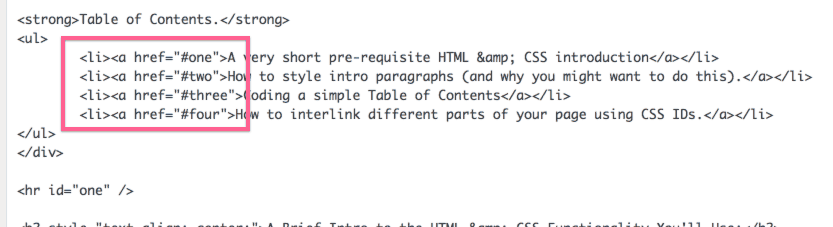
Next, we’ll simply link to these IDs in the table of contents.
This is super simple.
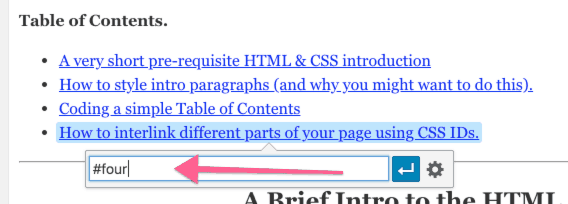
Ids are linked to with hashtags–just after the URL of the page.
Example: part 3 of this page would be https://doyouevenblog.com/blog-table-of-contents-css#three
Here’s how I linked to the parts in my table of contents:
Here’s what it looks like when you enter it in the WYSIWYG WordPress editor:
THAT’LL DO IT.
Here’s your call to action:
If you enjoy this post, all I ask is that you share and tell a friend!
Also, drop me a comment if you’re going to try this with your blog.
Bonus points if you get it working and drop your URL below!